Dogs Don't Eat Pizza

Formerly The DIY Bungalow

  • Home
  • About
    • About Karen & the Blog
    • Thirty Days of Gratitude
    • Habitat for Humanity ReStore Workshops
    • Stories from the Bungalow
    • Dogs Who Don’t Eat Pizza
      • Bear, the Original Dog Who Didn’t Eat Pizza
      • Hank Dog
      • Elvis Parsley
  • Project Index
    • DIY
    • Decorating
    • Shopping Tips
    • Repurposing and Upcycling
    • Paint and Color
    • Organizing
    • Cleaning
    • Recipes
    • Gardening
    • Holidays & Seasonal
    • Friday Five
  • Home Tour
    • The 1929 House
    • The First House
    • Room Reveals
  • Advertising
    • Disclosure and Privacy Policy
    • Advertising
  • Media
  • Contact
You are here: Home / DIY / Brighten Boring Built-Ins with Fabric

Brighten Boring Built-Ins with Fabric

June 21, 2013 By Karen Cooper 39 Comments

I’m a big ol’ chicken.

red rooster seed sign

No – not that kind of chicken.

I have been thinking about painting the back of our built-in bookcases in the living room for a while now. But I could never do it. The built-ins are custom-built and I just couldn’t stomach the idea of painting them and then hating it.

Then I had an idea…

What if I used fabric?

shelves with glass vase

Then it wouldn’t be permanent! No painter’s regret!

Add a pop of color to built-ins with fabric! Easy, inexpensive, and totally customizable!

As I’ve always said, DIY is a logic game, so I had to figure some things out:

1. How would I hang the fabric so that it would stay flat and un-wrinkled?

2. How would I hang the fabric so that it wouldn’t tear on a nail or staple?

3. If I attached the fabric to a board or something like that, the board would have to be thin enough to fit behind the shelves.

4. What kind of fabric? Nothing too heavy, nothing too light. I didn’t want anything with straight horizontal lines because the shelves are horizontal; I didn’t want anything with straight vertical lines because many of the books would make vertical lines. I needed something not too vertical, not too horizontal.

OK – here’s what we started with…our living room built-ins:

before - left side

Before – Left Side of the Living Room

before right side built in

Before – Right Side of the Living Room

Not bad, but a bit blah. The shelves seemed cluttered to me, and needed a pop of color.

How did I do it?

Here’s how to brighten boring built-ins with fabric:

First, measure the back of the built-in. Then measure it again. Trust me. Measure twice, cut once. Trust me. (I measured once and was off by an inch and it cost me another trip to the fabric store and extra fabric.)

Once I had measured the back of the built-in, I cut poster board to size.

What?

Poster board?

I’m not kidding. Poster board. I used just regular white poster board. Got it at the grocery store.

Because the space at the back of the built-in was 54 1/4 inches high, I needed more than one piece of poster board, so I connected the cut pieces together with duct tape.

measure and tape poster board

Right, duct tape. This just keeps getting better, right?!?

I used white duct tape, because it was the same color as the poster board and I didn’t want the tape to show through the fabric.

After I cut the poster board, then I cut the fabric. I added at least  half an inch to each side so that I could fold it around the poster board. Note: the fabric was 54 inches wide; the built-ins were 23 3/4 inches wide on the left and 25 1/4 on the right. That meant that I could just cut the fabric in half and get a good width.

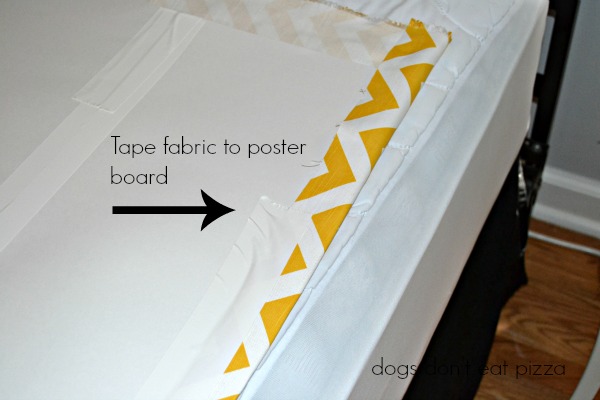
I centered the poster board on the cut fabric. I then attached the fabric to the poster board, again, with duct tape.

center poster on fabric

tape fabric to poster board

You can see I did this on the guest room bed. Then I remembered that I had a cutting board I could use that would make things much, much easier!

wised up and used cutting board

I bought the cutting board a while ago at Goodwill for 99 cents. It’s in great shape…

from 1967

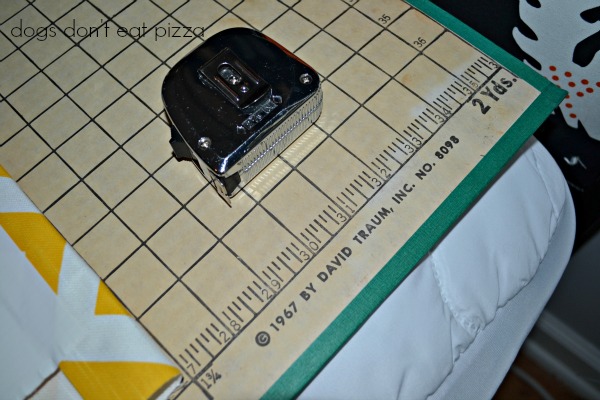
…especially since it’s from 1967. How cool is that?

But I digress.

Once I attached the fabric to the poster board, I made sure the fabric was even and lined up, and then it was time to hang it up.

I used a staple gun to hang it. The back of the built-in is plywood and the poster board and fabric were relatively thin. I figured a nail would be too much for the board and fabric.

stapled corner

The staples are small and would be hidden by either the shelves or the books to be placed on the shelves.

I then made the other three poster fabric panels, making sure to line up the fabric so that it looked even with the built-in next to it. Depending on what kind of pattern you use, you could make this easier (or harder). The chevron pattern wasn’t too hard to line up.

Here’s the finished product – first, without books and other stuff on the shelves:
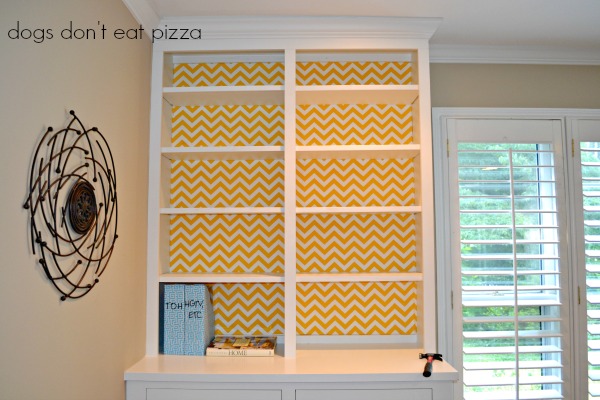
one side done

Then, all finished:

left side finished

Left Side – Finished

right side finished

Right Side – Finished (Note: The ceiling isn’t level; it’s not the built-in.)


my favorite shelf

My Favorite Shelf

red rooster seed sign

I got this sign at a thrift store for $5. The upcycled materials rooster came from a local store (no longer in business).

fire truck toy

I loved this fire truck toy…from a local consignment store.

shelves with glass vase

living room finished

There’s the big picture…I love the pop of color the fabric gives. Perfect.

Glad Hank got a nap today.

The great thing about this project is that anyone can do it. If you live in a rental, you could do this and just take them down when you move. Easy peasy.

So, just to compare…

Before:

before

After:

left side finished

Before:

before right side built in

After:

right side finished

Add a pop of color to built-ins with fabric! Easy, inexpensive, and totally customizable!

You might also like:

  • Block Party
    Block Party
  • Celebrating Two Years
    Celebrating Two Years
  • The Friday Five: My Five Favorite Design Tips
    The Friday Five: My Five Favorite Design Tips

Filed Under: DIY, Quick Room Updates, Readers' Favorite Posts 39 Comments

About Karen Cooper

Hi! I'm Karen. I call myself a “recovering lawyer” - I traded in my power suits for power tools and a life of DIY adventures. Join me for DIY, home decorating, repurposing and upcycling, and organizing projects and tips as I transform a 1929 Tudor bungalow into our home. I believe in merging old and new to make a house a home.

« After the Rains
Play Fort on the Fly »


Comments

  1. Holly says

    June 21, 2013 at 10:20 pm

    What a great change Karen! I love what it does to the bookcases and love how you put it together… I don’t think I would have thought of it.

    Reply
    • Karen Cooper says

      June 21, 2013 at 10:28 pm

      Thanks, Holly! It was a fun project (minus the extra trip to the fabric store!) and I love the color. Thanks again!

      Reply
  2. Kimberly Heavner says

    June 21, 2013 at 11:10 pm

    What a fantastic idea! It looks fabulous! Thanks for sharing.

    Reply
    • Karen Cooper says

      June 22, 2013 at 8:41 am

      Thanks, Kimberly!

      Reply
  3. Cindy Eikenberg says

    June 22, 2013 at 6:47 am

    Karen, this loos fantastic and I love your fabric and how you put it together. SO loving your vintage cutting board, it is awesome! Thanks for sharing, pinning and have a wonderful weekend! Oh and going to share on my FB page today. 🙂

    Reply
    • Karen Cooper says

      June 22, 2013 at 8:42 am

      Thanks, Cindy! Have a wonderful weekend, too!

      Reply
  4. Angie says

    June 22, 2013 at 7:55 am

    I love it! It added just the right pop of color and pattern. I’ve learned the hard way to measure twice, cut once! Have a great weekend!

    Reply
    • Karen Cooper says

      June 22, 2013 at 8:43 am

      Thanks, Angie! Yes – I usually do measure twice, but for some reason I didn’t here. Duh. Lesson learned. Have a great weekend!

      Reply
  5. Jocie@OPC The Better Half says

    June 22, 2013 at 9:14 am

    So fun and bright, Karen!
    Thanks so much for linking up to support habitat. Good luck and hope to see you back next week!

    Reply
    • Karen Cooper says

      June 22, 2013 at 10:21 am

      Thanks, Jocie! Thanks for hosting the link party for such a great cause!

      Reply
  6. Cynthia says

    June 22, 2013 at 10:33 am

    This is so creative! What a great pop of color. I love that it’s a low-committment change and one you can change fairly easily when you want something new. Very clever.

    Reply
    • Karen Cooper says

      June 23, 2013 at 7:41 am

      Thanks!

      Reply
  7. Sharon says

    June 22, 2013 at 3:39 pm

    Karen, it looks fantastic! The fabric really makes everything pop. Great job!

    Reply
    • Karen Cooper says

      June 23, 2013 at 7:42 am

      Thanks, Sharon!

      Reply
  8. Claire @ A Little Claireification says

    June 23, 2013 at 12:47 pm

    This is wonderful Karen!! They look fantastic! Pinning and adding to my BufferApp to share on FB & Twitter in a few.
    Great job! xoxo

    Reply
    • Karen Cooper says

      June 24, 2013 at 8:28 am

      Thanks, Claire! I appreciate it!

      Reply
  9. Lindsey, the Redhead Baby Mama says

    June 25, 2013 at 4:52 pm

    looks great!

    Reply
    • Karen Cooper says

      June 25, 2013 at 5:30 pm

      Thanks, Lindsey!

      Reply
  10. Lisa@ Cooking with Curls says

    June 26, 2013 at 1:11 pm

    That is pure brilliance Karen!!! I love it…..I wish I had shelves so I could copy it 🙂 The fact that it is put together with duct tape, make it a perfect project for me! By the way, your pinterest paw print, connects to twitter 🙂

    Reply
    • Karen Cooper says

      June 26, 2013 at 9:39 pm

      Thanks, Lisa! You could copy it on any bookcase that has removable shelves. Super easy project. Thanks for the tip re the paws – they are big, so you have to hover to make sure they go to the right place. Thanks again!

      Reply
  11. kristin says

    June 26, 2013 at 2:05 pm

    Love the updated look!
    XO
    kristin

    Reply
    • Karen Cooper says

      June 26, 2013 at 9:39 pm

      Thanks, Kristin! xoxo

      Reply
  12. Julie says

    June 27, 2013 at 10:43 am

    These look so good. I may try this…:)

    Reply
    • Karen Cooper says

      June 27, 2013 at 11:14 am

      Thanks, Julie! It’s so easy once you do one panel…try it and let me know how it goes!

      Reply
  13. Cris says

    July 11, 2013 at 12:55 pm

    My built-in’s shelves don’t come out and they are built directly into the wall, so there is no space behind them. I love this idea to add a pop of color behind the books, but is there a way to adapt what you did here to my set of circumstances?

    Reply
    • Karen Cooper says

      July 12, 2013 at 8:21 am

      Cris – Great question! Absolutely. Just cut the poster board to the size of the opening between the shelves, rather than as one big panel. Then attach them to the back of the shelves the same way. Given that those panels are going to be smaller and lighter, you could attach them with the staple gun (like in the post with the larger panels) or you could even use double-stick tape or hook and loop/Velcro to attach them. Good luck!

      Reply
  14. Shawna @DakotaCreekChic says

    July 12, 2013 at 8:45 am

    I love this idea. I have some built ins in my family room that are driving me crazy. They were not fabulous when we moved in and I painted them, but still don’t love them. This just might be my answer.
    Shawna

    Reply
    • Karen Cooper says

      July 12, 2013 at 8:49 am

      Excellent! I’m so glad. If you do the project, I’d love to see pics on how it turns out!

      Reply
  15. Allie says

    July 12, 2013 at 8:03 pm

    Those turned out marvelous. Thanks for all the helpful tips. Posterboard. Brilliant.

    Reply
    • Karen Cooper says

      July 12, 2013 at 8:21 pm

      Thank you, Allie!

      Reply
  16. Naomi says

    July 12, 2013 at 8:34 pm

    I love this! Now off to find cute fabric!

    Reply
    • Karen Cooper says

      July 12, 2013 at 9:39 pm

      Excellent! Thank you, Naomi!

      Reply
  17. Christy @ Creating a Beautiful Life says

    July 16, 2013 at 6:20 pm

    First, that’s so stinkin’ cute! Second, can’t believe you used poster board! Who would have thought?! I have a bookshelf I’ve been thinking about adding something to, but wasn’t sure how to do it. Now I know. I’m visiting from the Brag About It link party.

    Christy @ Creating a Beautiful Life

    Reply
    • Karen Cooper says

      July 16, 2013 at 9:22 pm

      Thanks, Christy! I’d love to see pictures of the bookshelf when you finish it (like Dogs Don’t Eat Pizza on Facebook and post pics there)! Thanks for stopping by.

      Reply
  18. Brenna@DomesticCharm says

    July 19, 2013 at 8:01 am

    What a great idea! And the fabric is great – very bright and cheerful. I’ll remember this for my playroom.

    Reply
    • Karen Cooper says

      July 19, 2013 at 8:17 am

      Thank you, Brenna! This would be a great idea for a playroom!

      Reply
  19. Julie Corbisiero says

    July 19, 2013 at 5:01 pm

    I really love the way it came out, you did a great job! I saw it on vmg206 brag about it.
    Julie from julieslifestyle.blogspot.com

    Reply
    • Karen Cooper says

      July 19, 2013 at 10:51 pm

      Thank you, Julie! Thanks for stopping by!

      Reply
  20. domain says

    August 22, 2014 at 10:47 pm

    It’s a shame you don’t have a donate button! I’d certainly donate
    to this fantastic blog! I guess for now i’ll settle for book-marking and
    adding your RSS feed to my Google account. I look forward to new updates and
    will share this blog with my Facebook group.
    Talk soon!

    Reply

Leave a Reply Cancel reply

Your email address will not be published. Required fields are marked *

This site uses Akismet to reduce spam. Learn how your comment data is processed.

Hi! I’m Karen. I call myself a “recovering lawyer,” because I turned in my power suits for power tools and a life of DIY. This blog is all about DIY, home decorating, repurposing and upcycling, and organization. I believe in merging old and new to make a house a home.


find projects here!

My Daybed in This Old House Magazine!

Daybed from Old Doors featured in This Old House Magazine
Best of 2016 - Best Blog DIY Category - thediybungalow.com

Disclosure

Dogs Don't Eat Pizza is a participant in the Amazon Services LLC Associates Program, an affiliate advertising program designed to provide a means for sites to earn advertising fees by advertising and linking to Amazon.com.  Dogs Don't Eat Pizza also participates in other affiliate programs.

To see my complete disclosure and privacy policy, click HERE.

About Karen

A "recovering lawyer," I turned in my power suits for power tools and a life of DIY. I believe in merging old and new to make a house a home. Read More…

  • Email
  • Facebook
  • Instagram
  • Pinterest
  • Twitter
© Copyright 2012-2021, Dogs Don't Eat Pizza, LLC (formerly The DIY Bungalow LLC).