Today was going to be the “big reveal” of my son’s room, but I wasn’t quite ready. His room needed some fresh window treatments. The problem is that I don’t sew, and I couldn’t quite find what I was looking for. So, today I spent the day making curtains for his room. Today’s post is about how I made these devilishly cool curtains and tomorrow will be the big reveal of the whole shebang (we still have to hang the trim and put back the stuff on his shelves).

I’ve seen several posts and pins about making curtains out of canvas drop cloths. I thought this was a genius idea, given that they are already hemmed, they are durable, and some of them look like linen. I thought they would look really good in a boy’s room, so an idea was born.

My son wanted a Duke-themed room, and he loves Duke basketball. I thought the dropcloth would be the perfect canvas for a painted basketball court! Each panel could be half the court.
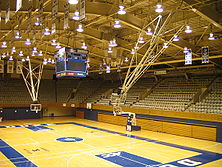
Here’s a picture of Cameron Indoor Stadium and Coach K Court, for your reference (oh, hallowed ground!):
|
|
The whole curtain-making process took the entire day, from 8:45 AM until 3:45 PM, including hanging the curtain rod and curtains. Here’s how to make your own painted dropcloth curtains!
Supplies Needed
– A drop cloth or two, depending on your project. I used two 5 ft. by 5 ft. canvas drop cloths for this. It’s ok if they have a leak-proof backing, so long as it’s flexible and allows the canvas to move. I bought the drop cloths at Home Depot for $7.98 a piece. The windows in D’s room are 53 in. long and about 32 in. wide (each), so these were the perfect size.
– Paint: I used flat latex interior paint. Why? Why not fabric or craft paint? Honestly, I’m not sure. Somehow I got it in my head that latex paint would be better (maybe because I spilled a bunch of it on a similar drop cloth when I was painting D’s room and it soaked it up and didn’t bleed through?). At the end of the day, I don’t think that the latex paint covered better or worse than a craft acrylic paint would.
– For the paint for the border around the court, I used Glidden’s “Soft Sapphire” in flat latex. I used an entire quart for this project, which cost $9.47.
– For the letters (the “DUKE” on either side of the court), I used hi-gloss latex paint in “Ultra White.” I already had this paint, so it was free.
– I outlined the letters and the circle in the middle with black paint pen, which I also already had.
– Tape: I used the Frogtape that I got in my swag bag at the Haven Conference. Cost: free.
– Paint brushes and rollers: I used the Purdy rollers and brushes – the best rollers and brushes – I already had.
– Curtain rod and curtain clips: I got these from Target. The rod was $16.99 and the clips were $4.74 per package and I bought two packages (one for each panel).
Also, there was a small Blue Devil decal on the Fathead decal page I ordered, in addition to the big one that I put on D’s wall. I used that small one for the middle of the court.
How to Create the Basketball Court Curtains
First, I laid out the drop cloth on the floor and taped off the border. I followed the creases in the drop cloth, which were fairly uniform on each drop cloth, to measure the border, but I measured to make sure the two drop cloths’ borders were similar in width. Here’s one of the panels/drop cloths, taped off:

The reason that the borders are uniform on three sides and short on the right side is that the right side border is actually the half-court line. Thus, it needs to be thinner than the border around the court.
So, I painted the border next:

Then, I added the writing on the court. The basketball court in Cameron Indoor is called “Coach K Court,” named for Mike Krzyzewski, the head basketball coach (and, no, I did not have to look up how to spell “Krzyzewski”). I free-handed these letters, using a thick sharpie.

Once I had done the first panel, I made the second panel. I did exactly the same thing as I had for the first panel, except that the “Coach K Court” would be on the opposite side and flipped from the first panel. Then I painted the circle at mid-court. For this, I moved outside, so that I could lay out both panels and make the two halves of the circle line up.
Once I got the circle done, I stenciled the letters on each end of the court/curtain panel. A note about the stenciling: I failed stenciling. I had great stencils, although they were a bit flimsy, and the paint got everywhere. Luckily, I had enough paint (both white and blue) to touch up the letters after I massacred them stenciled them on.
After the letters’ paint had dried, I outlined the stenciled letters and the circle at mid-court with black paint pen, so that it would clean up the edges of the paint there and also make the letters and circle stand out. I also cut the small Blue Devil decal in half and put half on each half-circle at mid-court.

Then I brought both panels back inside and lined them up, to make sure everything fit together. Also, it was 100 degrees and humid outside and I had had enough of that.
And here is another view of the window and curtains and you can also see the decal on the wall, too:
I love these curtains, for a number of reasons:
- First, they came out exactly how I had pictured and drawn them. It’s always amazing to me when I can really transfer what’s in my brain in concept to actuality.
- Second, they look perfect in the space. They are the right color and the right size and just right.
- Third, I love that I didn’t have to sew anything and the total cost was quite reasonable, given that they are completely customized to be exactly what I wanted.
- Last, my son LOVED them. He couldn’t believe I had painted them myself. It’s nice to have something creative and homemade in his room. I really believe that it’s good to have something you made in each room of your home.
So tomorrow will be the finish line. See all those empty shelves? The books will be back on them, as will his lego boxes and creations. Also, there will be crown molding and everything will be all tidied up.


Leave a comment