Dogs Don't Eat Pizza

Formerly The DIY Bungalow

  • Home
  • About
    • About Karen & the Blog
    • Thirty Days of Gratitude
    • Habitat for Humanity ReStore Workshops
    • Stories from the Bungalow
    • Dogs Who Don’t Eat Pizza
      • Bear, the Original Dog Who Didn’t Eat Pizza
      • Hank Dog
      • Elvis Parsley
  • Project Index
    • DIY
    • Decorating
    • Shopping Tips
    • Repurposing and Upcycling
    • Paint and Color
    • Organizing
    • Cleaning
    • Recipes
    • Gardening
    • Holidays & Seasonal
    • Friday Five
  • Home Tour
    • The 1929 House
    • The First House
    • Room Reveals
  • Advertising
    • Disclosure and Privacy Policy
    • Advertising
  • Media
  • Contact
You are here: Home / DIY / The Magic Lamp

The Magic Lamp

April 5, 2013 By Karen Cooper 5 Comments

My poor son has been reading in the dark for weeks.

OK, not really in the dark, but close. He was still using a small, toddler-size light by his bed, and it just wasn’t enough light for his late-night reading adventures.

I won’t leave you in the dark any longer! (Ha!)  Here’s his new lamp:

finished lamp up close from thediybungalow.com

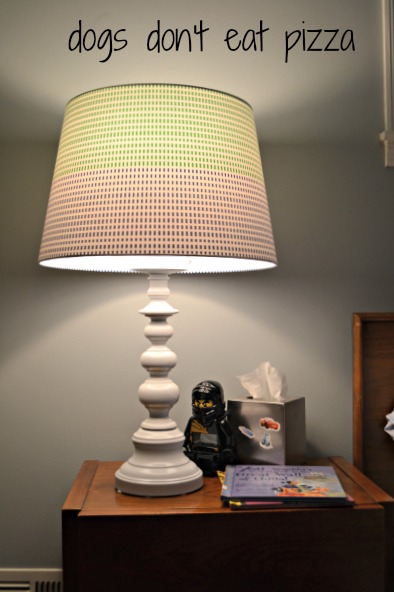
So you can see how much better the scale is…

whole room with new lamp from thediybungalow.com

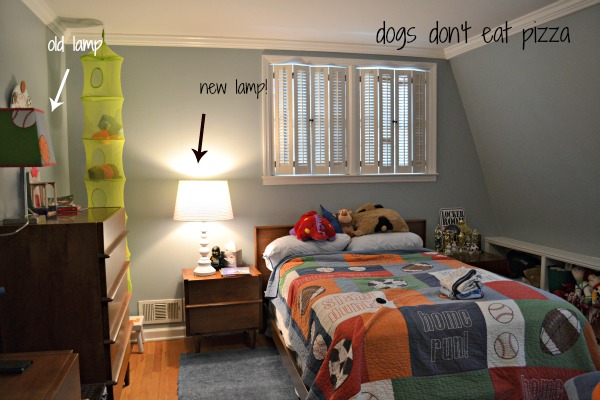
No more reading in the dark!

I know what you’re thinking…Pottery Barn Kids? Land of Nod? Where did she get that lamp?

Um, the Last Chance Thrift Store. For $6.99.

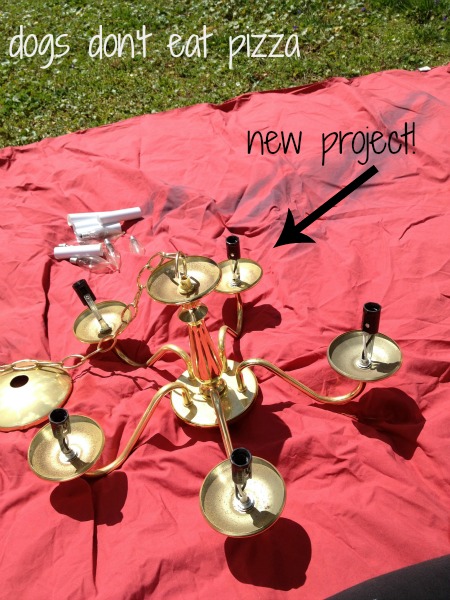
Here’s what it looked like before:

lamp before at thediybungalow.com

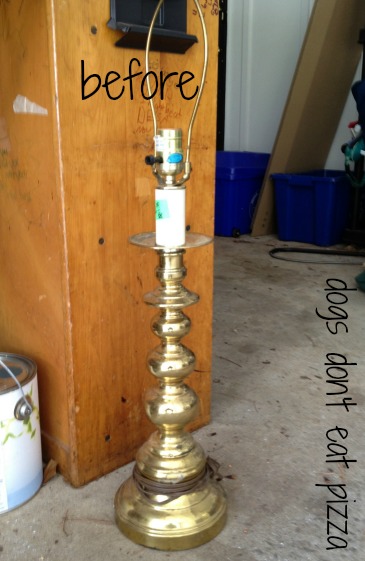
No shade, tarnished brass, but otherwise totally fine.

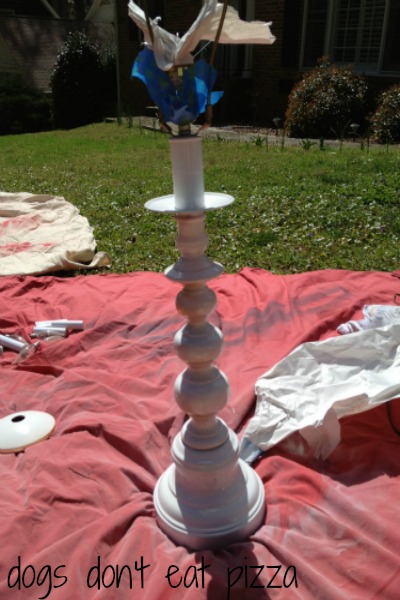
I gathered my supplies, including deglosser, white lacquer spray paint, tape, and some towels.

supplies for lamp by thediybungalow.com

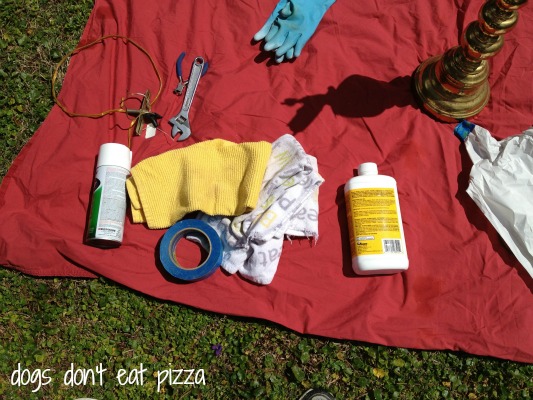
After deglossing the lamp and letting it dry for 10 minutes, I spray painted it. It took about three light coats to cover the brass.  I took care to cover the socket and the cord.

painting lamp at thediybungalow.com

I might have also worked on another project, too, while I was all spray-paintey.

project for another day at thediybungalow.com

To finish the lamp, I added a large shade from Ikea ($19.99) and some felt rounds to the bottom of the lamp to prevent scratching the night table.

finished lamp in room at thediybungalow.com

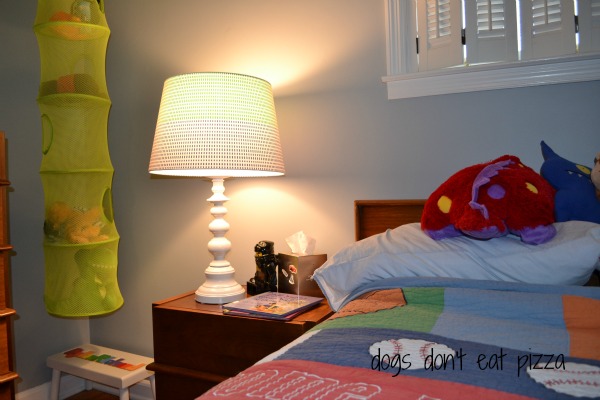
So there you go…a new lamp for a grand total of $27.

finished lamp up close from thediybungalow.com

No more reading in the dark.

Thanks for stopping by! What are you working on this weekend?

blog signature


You might also like:

  • If the second time you don't succeed, try, try again (three's a charm, right?).
    If the second time you don't succeed, try, try again…
  • If At First You Don't Succeed, Try, Try Again.
    If At First You Don't Succeed, Try, Try Again.
  • The Time I Went in for a Bookshelf and Got a Kitchen Island for Free
    The Time I Went in for a Bookshelf and Got a Kitchen Island…

Filed Under: DIY, Paint and Color 5 Comments

About Karen Cooper

Hi! I'm Karen. I call myself a “recovering lawyer” - I traded in my power suits for power tools and a life of DIY adventures. Join me for DIY, home decorating, repurposing and upcycling, and organizing projects and tips as I transform a 1929 Tudor bungalow into our home. I believe in merging old and new to make a house a home.

« Curtain Call: DIY Custom Curtains with a Sharpie
A Thrift Store-y (or, why to trust your gut when thrift shopping) »


Comments

  1. Cynthia says

    April 5, 2013 at 9:49 pm

    Looks great. Can’t wait to see the next project in progress. What is deglosser and why did you use it?

    Reply
    • Karen Cooper says

      April 5, 2013 at 10:37 pm

      Deglosser is like liquid sandpaper. It substitutes for sanding, which I generally hate. You should wear gloves when using it, though. You can find it at Lowe’s or Home Depot.

      Reply
  2. Evelyn @ My Turn for us says

    April 7, 2013 at 8:39 am

    It is a magic lamp:)) Deglosser huh? I always learn so much hopping around the blogosphere:))) Thanks!!

    Just dropping in from The Creative Headquarters to meet you!!!

    Hugs!

    Reply
  3. Sherry says

    April 8, 2013 at 5:18 pm

    What a great transformation! I totally keep eyeing lamps every time I visit a thrift shop…someday soon I will be doing one of these! Thanks for sharing. Can’t wait to see the other project too…:)

    Reply
  4. Laurie @ Vin'yet Etc. says

    April 9, 2013 at 8:59 am

    I love what you did with that lamp!! I happen to need a new one, hope my thrift shop will yield one just as cool! I also want to say I love, love how you’ve built some storage under your slant wall! We live in an older house with slant walls and what you’ve done is very clever! Thanks for sharing!

    Laurie @ Vin’yet Etc.

    Reply

Leave a Reply Cancel reply

Your email address will not be published. Required fields are marked *

This site uses Akismet to reduce spam. Learn how your comment data is processed.

Hi! I’m Karen. I call myself a “recovering lawyer,” because I turned in my power suits for power tools and a life of DIY. This blog is all about DIY, home decorating, repurposing and upcycling, and organization. I believe in merging old and new to make a house a home.


find projects here!

My Daybed in This Old House Magazine!

Daybed from Old Doors featured in This Old House Magazine
Best of 2016 - Best Blog DIY Category - thediybungalow.com

Disclosure

Dogs Don't Eat Pizza is a participant in the Amazon Services LLC Associates Program, an affiliate advertising program designed to provide a means for sites to earn advertising fees by advertising and linking to Amazon.com.  Dogs Don't Eat Pizza also participates in other affiliate programs.

To see my complete disclosure and privacy policy, click HERE.

About Karen

A "recovering lawyer," I turned in my power suits for power tools and a life of DIY. I believe in merging old and new to make a house a home. Read More…

  • Email
  • Facebook
  • Instagram
  • Pinterest
  • Twitter
© Copyright 2012-2021, Dogs Don't Eat Pizza, LLC (formerly The DIY Bungalow LLC).