Dogs Don't Eat Pizza

Formerly The DIY Bungalow

  • Home
  • About
    • About Karen & the Blog
    • Thirty Days of Gratitude
    • Habitat for Humanity ReStore Workshops
    • Stories from the Bungalow
    • Dogs Who Don’t Eat Pizza
      • Bear, the Original Dog Who Didn’t Eat Pizza
      • Hank Dog
      • Elvis Parsley
  • Project Index
    • DIY
    • Decorating
    • Shopping Tips
    • Repurposing and Upcycling
    • Paint and Color
    • Organizing
    • Cleaning
    • Recipes
    • Gardening
    • Holidays & Seasonal
    • Friday Five
  • Home Tour
    • The 1929 House
    • The First House
    • Room Reveals
  • Advertising
    • Disclosure and Privacy Policy
    • Advertising
  • Media
  • Contact
You are here: Home / Repurposing and Upcycling / Memo Board from an Old Window

Memo Board from an Old Window

July 11, 2013 By Karen Cooper 22 Comments

Do you have an old window lying around? Make a dry-erase memo board from an old window!

memo board from old window

I needed a calendar for my office/desk area, but I didn’t want to buy another dry erase calendar/memo board.

I still have a pile of old windows in my garage from a curbside rescue, and I realized that glass is the perfect dry-erase surface!

I would need a background for the board, though. The walls in my office (the guest room) are gray, so I wanted something colorful for a backing. What did I have on hand? No scrapbook paper or fancy paper. I didn’t want to paint it.

Wrapping paper! I had plenty of that!

Let’s get started…

How to Make a Memo Board from an Old Window

First, clean the window.

first clean the window

Once both sides of the window are clean and while they are drying, get your supplies together. You need: wrapping paper (or you could use scrapbook or other paper – use what you have on hand), tape, and (as you will see in a bit) poster board is helpful.

what you need for this project

As you can see, Hank was supervising. A dog supervisor is also helpful.

Anyway, pick the papers you want to use and cut them to size. I just laid it over the window pane and then cut it. It doesn’t have to be perfect.

paper in pane

I attached the paper with duct tape.

attach paper with duct tape

NOTE: Attaching the paper with duct tape worked, and it was relatively easy and painless to do. But then I ran out of duct tape (GASP!).

I tried using packing tape, but it didn’t work as well. The tape just wasn’t as flexible.  I needed a different way.

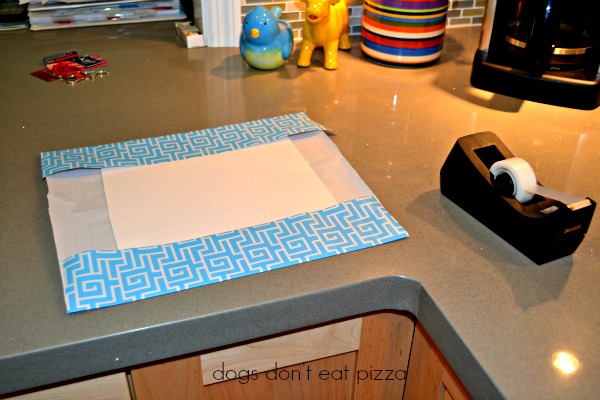
Instead, I started cutting poster board to the size of the pane and then wrapped – like a present (duh!) – the poster board with the wrapping paper. Then I could just attach the poster board piece in place with tape, which was much, much easier to do.

wrap poster board

do it this way instead

Once all the paper is attached, well, to be honest, it looks ugly. Don’t despair! The back won’t show!

the finished back

The moment of truth is next…flip it over.

finished memo board front side

Voila!

Next, attach rings to hang it. I love the Ook hangers (no, they did not pay me to say that. I really do love them).

how to hang it

Then hang it up. I put mine right over my desk.

memo board front view

Ready to go!  I wrote in the days of the week and it’s done!

memo board Friday pane

memo board from old window

The whole project took me a little more than an hour and cost me nothing, because I had all the supplies on hand.

To see how I updated this memo board, click HERE.

You might also like:

  • The Friday Five: Five Uses for Old Windows
    The Friday Five: Five Uses for Old Windows
  • Family Command Center...Done!
    Family Command Center...Done!
  • Sprucing Up the Window Memo Board
    Sprucing Up the Window Memo Board

Filed Under: DIY, Organizing, Readers' Favorite Posts, Repurposing and Upcycling 22 Comments

About Karen Cooper

Hi! I'm Karen. I call myself a “recovering lawyer” - I traded in my power suits for power tools and a life of DIY adventures. Join me for DIY, home decorating, repurposing and upcycling, and organizing projects and tips as I transform a 1929 Tudor bungalow into our home. I believe in merging old and new to make a house a home.

« Christmas in July: Barking Up a Different Christmas Tree
Defy Definition: Finding Your Design Style »


Comments

  1. Thistlewood Farms says

    July 12, 2013 at 10:47 am

    Super cute project!!

    So fun and easy!!

    Have a blessed and wonderful day!!

    Reply
    • Karen Cooper says

      July 12, 2013 at 11:02 am

      Thank you, KariAnne! Have a great day, too!

      Reply
  2. Cheryl B. says

    July 12, 2013 at 11:27 am

    Hi Karen.

    I found you through Hometalk. I love this project but have a different question. You have some window shades featured on your site. Do you have a “How To” post for those?
    Thanks.

    Reply
    • Karen Cooper says

      July 12, 2013 at 5:49 pm

      Hi Cheryl – I used this tutorial to make the faux Roman shades: http://www.impartinggrace.com/2011/05/faux-roman-shade-tutorial.html. Thank you for pointing out that I didn’t have that on my kitchen post (I made them later on); I will add it now. Good luck! I’d love to see how they turn out if you try it.

      Reply
  3. kristin says

    July 12, 2013 at 7:29 pm

    Oh i love this idea and have a window just sitting around 🙂
    Pinned.
    xo
    kristin

    Reply
    • Karen Cooper says

      July 12, 2013 at 8:23 pm

      Perfect! Let me know if you do the project – would love to see pictures! Thanks, Kristin!

      Reply
  4. LuAnn Braley says

    July 12, 2013 at 10:52 pm

    That is SO cool! We have all sorts of stuff around the house into which we just moved that will be excellent fodder for repurposing. I cannot WAIT to get into it!

    Reply
    • Karen Cooper says

      July 13, 2013 at 8:51 am

      Perfect! Thanks, LuAnn! I’d love to see some of your repurposing projects.

      Reply
  5. Inspire Me Heather says

    July 13, 2013 at 9:35 am

    What a great idea and it looks super cute too with the pretty pattered paper you’ve picked out (that’s a lot of P’s…)!

    Reply
    • Karen Cooper says

      July 13, 2013 at 12:10 pm

      Thanks, Heather! Love me some alliteration!

      Reply
  6. Claire @ A Little Claireification says

    July 13, 2013 at 9:57 am

    This turned out so cute, Karen!! How fun! I love the wrapping paper idea too. Pinning!
    xoxo

    Reply
    • Karen Cooper says

      July 13, 2013 at 12:10 pm

      Thanks, Claire! You could also use scrapbooking paper, construction paper, posterboard – the ideas are endless! xoxo

      Reply
  7. vickie says

    July 13, 2013 at 2:32 pm

    I love this. Do you use regular dry erase markers or something else to write with?

    Reply
    • Karen Cooper says

      July 13, 2013 at 9:33 pm

      Yep, just regular dry erase markers. And they wipe right off with a dry-erase eraser or paper towel. Thanks, Vickie!

      Reply
  8. Kelly @ Eclectically Vintage says

    July 18, 2013 at 12:50 pm

    You know how I feel about old windows! Love the fun colors!!
    Kelly

    Reply
    • Karen Cooper says

      July 18, 2013 at 10:21 pm

      Thanks, friend! I have a thing for windows, too! I can’t resist.

      Reply
  9. Cindy Eikenberg says

    July 18, 2013 at 7:12 pm

    Hi Karen! I just wanted to stop by and thank you for sharing this great project at Best of the Weekend and let you know this is one of my favorite picks and will be featured tomorrow night. Hope you can come over and party with us! Have a happy Friday!

    Reply
    • Karen Cooper says

      July 18, 2013 at 10:20 pm

      Thank you, Cindy! Par-tay! I’ll be there. Thank you again, and thank you for hosting the party!

      Reply

Trackbacks

  1. Best of the Weekend with Features! {Week 13} says:
    July 19, 2013 at 7:58 pm

    […] Memo Board from Old Window from Dogs Don’t Eat Pizza […]

    Reply
  2. Keeping Track of the Week with an Old Window says:
    July 23, 2013 at 8:00 am

    […] blogs at Dogs Don’t Eat Pizza, where she was lucky enough to find a pile of old windows on the curb that her neighbor was […]

    Reply
  3. 5 Easy DIY Dry Erase Boards says:
    February 23, 2014 at 5:57 pm

    […] is an interesting project to use an old window frame and turn it into a divided dry erase memo-board. You can use the sections as week days or in any way you’d like. It is very easy, all you […]

    Reply
  4. Upcycled Home Decor - Todays Creative Blog says:
    August 18, 2014 at 8:42 pm

    […] took one of my found windows and made a dry-erase memo board/calendar. Glass is the perfect dry-erase surface. First I cleaned the window well with all-purpose […]

    Reply

Leave a Reply Cancel reply

Your email address will not be published. Required fields are marked *

This site uses Akismet to reduce spam. Learn how your comment data is processed.

Hi! I’m Karen. I call myself a “recovering lawyer,” because I turned in my power suits for power tools and a life of DIY. This blog is all about DIY, home decorating, repurposing and upcycling, and organization. I believe in merging old and new to make a house a home.


find projects here!

My Daybed in This Old House Magazine!

Daybed from Old Doors featured in This Old House Magazine
Best of 2016 - Best Blog DIY Category - thediybungalow.com

Disclosure

Dogs Don't Eat Pizza is a participant in the Amazon Services LLC Associates Program, an affiliate advertising program designed to provide a means for sites to earn advertising fees by advertising and linking to Amazon.com.  Dogs Don't Eat Pizza also participates in other affiliate programs.

To see my complete disclosure and privacy policy, click HERE.

About Karen

A "recovering lawyer," I turned in my power suits for power tools and a life of DIY. I believe in merging old and new to make a house a home. Read More…

  • Email
  • Facebook
  • Instagram
  • Pinterest
  • Twitter
© Copyright 2012-2021, Dogs Don't Eat Pizza, LLC (formerly The DIY Bungalow LLC).